
Architecture
C Elegans Connectome Framework and Engine
 |
Architecture C Elegans Connectome Framework and Engine |
It has long been a dream of mine to connect a robot to a artificial brain and my research with OpenWorm has given me access to develop a simulated connectome to an Lego Mindstorms EV3 robot. The EV3 comes with motors, sensors and a Linux based computer system that ties the sensor and motors together as well as allows programs outside of the robot to communicate with it using WiFi and Bluettoth communications. Furthermore to make the communications easier between my Connectome Framework and the EV3 robot, I use a product called Monobrick which makes this programming very easy.
1.
Introduction
Researchers, in general, have a tendency to model specific animal physiology and
pathways, focused on experimentation to discover truths about specific
behaviors. Modeling and simulations are great tools and give us great insight
into whether our observations and underlying theories of what causes those
observations are true. However, modeling or simulating specific behaviors can
lead to skewed interpretations by negating the organism as a whole. It is not
always obvious that a small portion of an organism will deliver the same results
when more components of the organism are added into the model.
There have been a few models and simulations conducted regarding the
Caenorhabditis Elegans (C. Elegans) nematode but no one has yet created a
simulation that encompasses the entire connectome. My C. Elegans connectome
research involves individual programs, each representing one of the individual
302 neurons that make up the C. Elegans connectome which
I label the Connectome
Engine. To stimulate the sensory neurons in the connectome and to read and
assimilate the output of motor neurons, I added applications for this purpose I
call the Connectome Framework. The Connectome Framework are the intermediate
programs between the EV3 robot and the C. Elegans connectome.
Results showed the connectome was
recursive in many connections and that both connectome and motor output was
continuous and on-going without further stimulation. It is my conjecture that
the connectome would have continued running nearly forever if allowed and
unimpeded.
There is an important distinction with the research this paper represents as
opposed to most simulations in that the model is:
Complete: The entire connectome is represented. However it should be noted that
not all sensory organelles or inputs are in the model at this time. As an
example, stretch receptors which could play an important role in C Elegans
locomotion behaviors.
Continuous: Like a “live” nervous system, the stimulation is continuous and
active. Sensory input changes behavior and nothing more.
Physical: The Connectome is connected to a real three-dimensional robot that is
interacting with its environment in unpredictable ways.
Individual: Each Neuron is represented by an individual program and like
biological neurons, dendritic inputs and axonal outputs can only be given by the
amount of stimulation consumed by the program (neuron).
Analog: Since the Connectome is represented by individual programs, the time in
which a stimulation of a program occurs is not fixed, and can happen and change
as environmental factors evolve.
Temporal: Stimulation changes over time and as environmental factors change.
Each program is set to only fire it’s axon as certain thresholds are met, and
the program will zero out (depolarize) over time.
There are three parts
that make up the Connectome simulation: the robot which provides sensory input
and motor output to read and navigate through the environment, a Connectome
framework that reads sensory data and writes motor values from the connectome
engine, and the Connectome engine that simulates each individual neuron of C.
Elegans.
In late 2012, Lego announced that it would be coming out with a new Lego
Mindstorms robot kit in the Fall of 2013. The new robotic kit would be called
Lego Mindstorms EV3 and was an upgrade from the previous model of Lego
Mindstorms NXT2. The primary features that made the EV3 attractive for
simulation research is that it is inexpensive (~$350 USD), the computer (or
Brick) is a Linux based computer and that the user could communicate with the
robot via Bluetooth and WiFi communications.
Having purchased a prerelease, educational version of the EV3 in early August,
2013, allowed me to build a simple robot that could mimic some sensory inputs of
the C Elegans nematode. The EV3, like its predecessors, has limited sensory
inputs (Four total) and motor outputs (Four total). I decided on three touch
sensors and one food sensor simulation. The robot is comprised of a left and
right body touch sensor, a sonar or nose touch sensor and I use sound to
simulate the presence of food. Each of these sensors stimulate specific neurons
of the Connectome. I attached two motors to the EV3 on either side to simulate
the right and left body movement of C Elegans.

In order to interact with the robot I created two programs:
an Input program that reads the sensors on the robot and stimulates the
appropriate neurons when specific thresholds are met, and an Output program that
accumulates stimuli from motor neurons and in turn sends the amount of power to
be applied to each of the two engines. These two programs are the intermediary
applications between the robot and the connectome.
2.2.1
Sensory
Input Program
The Sensory Input
Program sets up a WiFi connection with the EV3 robot via a software product I
use called Monobrick (http://www.monobrick.dk)
that allows me to read sensory information. A Timer control is used to poll the
sensors every 100 milliseconds. The two touch sensors (Left and Right) have a
very simple input of either “On” or “Off”. If a touch sensor is pushed in, the
sensor sends and the Input program reads an “On”. If the button on the sensor is
out (not pushed in), the sensor sends and the Input program reads “Off”. I use
the sonar sensor to simulate a nose touch by reading the number of centimeters
detected between the robot and an object in front of the sensor. Currently, I
have the threshold set to within 20 centimeters of an object; i.e. if the
distance is greater than 20 centimeters, the sensor will be ignored, if 20
centimeters or less, I stimulate nose touch neurons. Food sensation is
activated by a sound sensor. I use a threshold of 40 decibels to start where if
a sound is introduced greater than 40 decibels, food presence is simulated by
activating the appropriate neurons. This threshold can be changed on the fly by
changing the value on the Input program. Likewise, the neurons that will be
stimulated when a sensor threshold is met can be changed on the fly as well.
Currently, I have set up the following neurons to be stimulated when thresholds
are met:
Left body touch:
PLML, PVDL, PDEL, PVM and LUAL
Right body touch:
PLMR, PVDR, PDER, PVM and LUAR
Nose touch (sonar):
ASHL, ASHR, FLPL, FLPR, OLQDL, OLQDR, OLQVL, OLQVR
Food (sound): ADFL,
ADFR, ASGL, ASGR, ASIL, ASIR, ASJL, ASJR, AWCL, AWCR, AWAL and AWAR
Each stimulation of
the neurons listed, sends a value of one (1) to each of the individual programs
that represent these neurons in the connectome.
The input program
displays as:

Whereas
 sets
the IP Address where the Connectome Engine resides.
![]() sets
the sound threshold. The user can change this value at any time and the
sensitivity will increase or decrease for food stimulation dependent on this
value.
sets
the sound threshold. The user can change this value at any time and the
sensitivity will increase or decrease for food stimulation dependent on this
value.
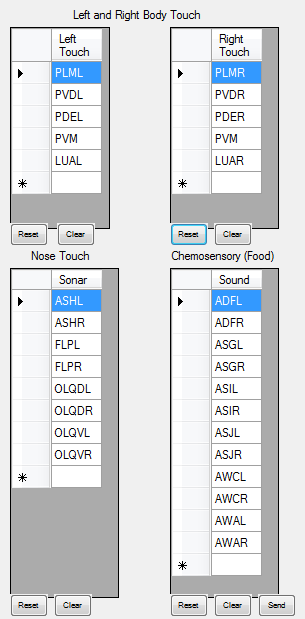
Lists the neurons
that will be activated by each sensor once the threshold is met or exceeded.
These neurons are listed in a data grid and can be changed at will. The clear
and reset buttons at the bottom of each grid will clear the grid or delete all
neurons. Reset will restore the defaults. The Food grid has a Send button that
allows me to send the weighted value of one (1) to the neurons listed in the
grid on demand. This is useful if the researcher wishes to stimulate food
neurons without having to make a lot of noise.
The buttons at the
top and middle have specific functions:
“Timer On/Off”
allows the researcher to start or stop polling of the sensors.
“Clear” just clears
the status box to the right.
“Send Poison” sends
a weight of -99999 to all the neurons in the connectome which tells the neuron
to kill itself. This is used to stop the connectome very quickly rather than
stopping 300 programs individually.
“Test Sensors”
simply reads the sensors on demand and displays the results in the status box.
“Exit” ends the
Input program.
 is
a special condition that allows the researcher to send a weighted value of one
(1) to the neurons listed in the two textboxes below it. I created and used
this for the neuromechanical simulation where I only need to stimulate these
two neurons to activate muscle circuits
(Gait modulation in C.elegans: an integrated neuromechanical model
(2012) Jordan H. Boyle, Stefano Berri and Netta Cohen)
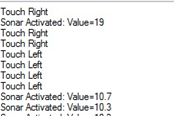 is the status box
that shows whatever activity is going on in the Input program. As a sensor is
activated, the sensor and value is displayed here.
2.2.2
Motor
Output Program
The Output program captures motor neuron outputs and displays the values in a
matrix whereby each cell of the matrix represents a body muscle of C Elegans.
Muscles 7-24 (body muscles as opposed to head muscles) are accumulated into a
value of either left or right, and the value is sent to the respective motor on
the robot. The Researcher can set a maximum motor output whereas a motor is
running at full speed when it’s value is set to 100. This is usually too fast on
smooth terrain so I default the max value to 20 but this can be changed at any
time and on the fly. The value of 20 for motor speed represents the condition
whereas if the accumulated value exceeds 20, the Output program will reset the
value to 20. The Output program communicates to the robot using Bluetooth
communications and the Monobrick API.
The Output program displays as:
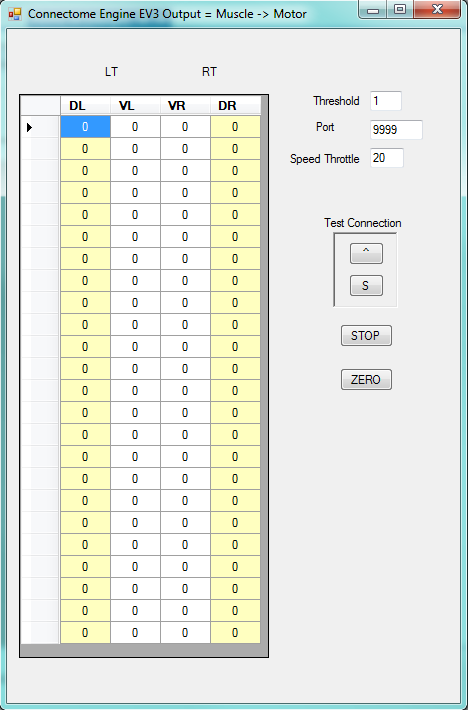
Viewing the matrix, the left body muscles are represented on the left as
MDL01 – MDL24, MVL01-MVL24 and the right body muscles are represented on the
right as MDR01-MDR24, MVR01-MVR24. The values (the picture shows Zeros) will
change as these muscles are individually stimulated. The labels at the top LT
and RT will display the accumulated values.
Textboxes are as follows:
“Threshold” is the number of seconds an accumulation of muscle stimuli can be
dormant before the accumulator is set to zero (0) or depolarized.
“Port” is the receiving port for UDP (User Datagram Protocol) communications
from the motor neurons.
“Speed Throttle” is the maximum speed the Researcher wants to allow the robot
to run. Twenty is the default and represents 20% of full motor speed.
Buttons are as follows:
Under Test Connection, there are two buttons: “^” and “S”. These buttons
allow the user to move the robot forward (^) and to stop (S) the robot. This
makes sure the Bluetooth communications is working.
“STOP” forces the robot to stop and disconnects any further comminications.
“ZERO” simply forces the matrix values to zero (0).
2.3
The
Connectome Engine
The Connectome itself is comprised of 300 individual programs that make up
the C Elegans connectome. There are 300 because no other neuron has any
documented connections to CANL and CANR so I do not activate these two neurons.
I created a startup program, RunConnectome.exe, that reads a local Microsoft
SQL 2012 database that contains the name and port of each individual neuron, the
neurons and/or muscles that it connects too and the weighted value determined by
the number of connections the pre-synaptic neuron has to the post-synaptic
neurons it connects too. RunConnectome.exe starts each program (neuron) based on
these values. Each neuron program communicates with its linked neurons using UDP
(User Datagram Protocol). UDP uses the port and IP address of the program it
wishes to communicate with and sends the weighted value to the program(s) when a
threshold is met of accumulated values.
|
|
The single neuron is assigned a Socket or Port number which
identifies the Neuron for the User Datagram Protocol (UDP). This image
shows the Neuron AVAR is assigned port 11054, has just received a value
of “15” and when its axon fires, it will send a value of 1 to ADER (port
11003), a value 1 to AS1, another value of 1 to AS1 (two connections to
the same neuron represent a synaptic junction and a gap junction).
Repective values will be sent to AS10 = 1 and 1, AS11 = 6, AS2 = 2, and
AS3= 1 and 1. |
Each neuron program must accumulate a value greater than Fifteen (15) before
the threshold is exceeded and the Axon fires, or the program sends values to all
the neuron programs it connects too. In addition, there is a timer control that
triggers every 200ms and if there is no input activity in that 200ms, the
accumulation counter is set to zero (0). This simulates the action potential of
the neuron.
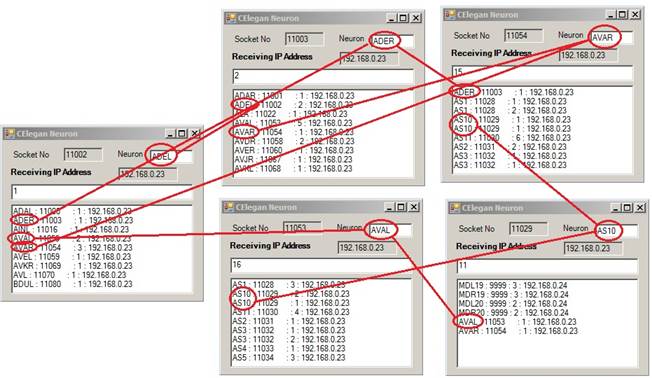
The diagram above shows just five (5) of the neurons as they are being
activated. The red links show the complexity of the connectome and the recursive
structure. Note that AVAL stimulates AS10 which in turn stimulates AVAL.
There is also a built-in recording function that can be set to record each
axon firing into a data table that tracks when a synapse is fired and the weight
that was sent to that neuron. I use this data later to do a raster plot.

Simulated C Elegans Connectome Process Flow
To see the overall Connectome Framework, Engine and EV3 robot working, view this video:
The individual neuron VD7 Running in the Connectome Engine
To validate the connectome and the whole organism model, I did Four (4) experiments represented in this video:
The first segment is the EV3 running on the full connectome model. This demonstrates that the connectome (neurons and their connectivity) gives rise to the behavior that I would expect; i.e. a natural state and food stimulation moves the worm forward, nose touch stimulation causes the worm to move backwards and then begin moving forwared again. There is no other programming interfacing to the the EV3 robot other than the connectome interaction.
The second segment is from the work presented in the paper "Gait modulation in C.elegans: an integrated neuromechanical model (2012) Jordan H. Boyle, Stefano Berri and Netta Cohen". I created a connectome of just the AVB, DB, DD, VB and VD neurons and stimulated the AVB neurons which in turn did show that this basic circuit does indeed cause locomotion in the C Elegans nematode.
The third and fourth segments show the work from the paper "Synaptic polarity of the interneuron circuit controlling C.elegans locomotion (2013) Franciszek Rakowski, Jagan Srinivasan, Paul W. Sternberg and Jan Karbowski". First I ablated (did not activate the programs that represents) ASH and AVB, and second I ablated the neuron DVA. In both cases the robot would move forward but when reverse direction stimuli was introduced as with the sonar=nose touch, the robot would not reverse for an ordinate amount of time showing, as the paper indicates, the important role of these neurons in the connectome.
From my work in the neurosciences, I added a log for each time a neuron is stimulated and created a raster plot of neural activity to show the connectome activity on a temporal axis. The Excel Spreadsheet (RasterPlot.xlsx) shows each neuron and muscle as it was stimulated and how much weight was applied over time.
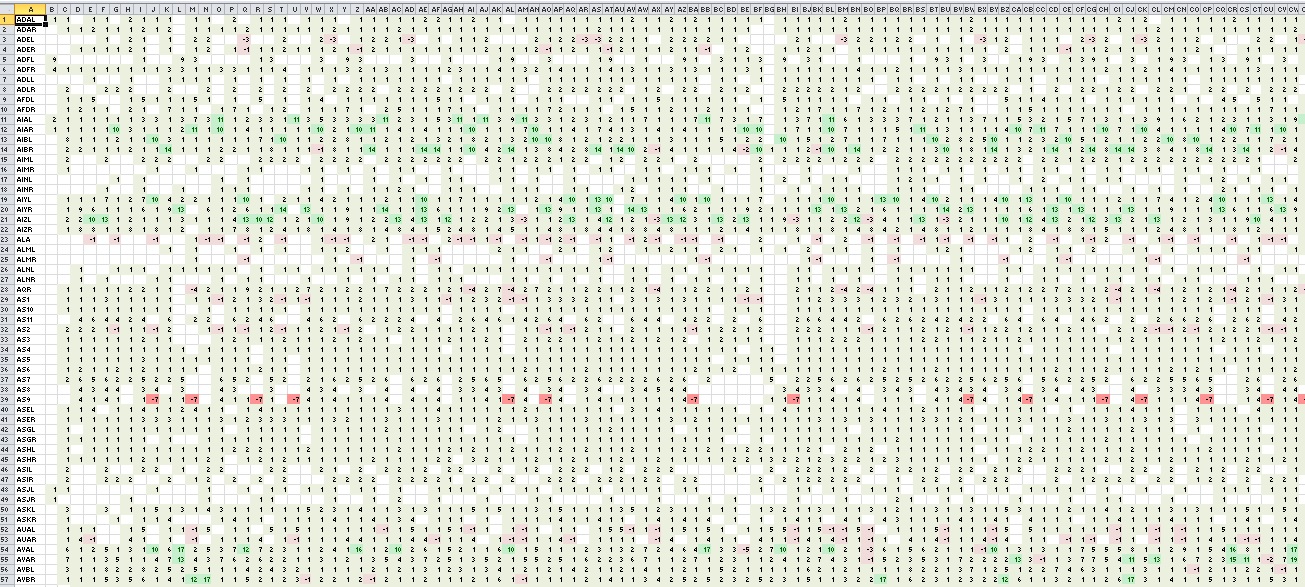
Example of a Raster Plot of the connectome engine
For more information and history, check out the following powerpoint: OpenWorm Extended Research.pptx
Return to
Scope || History ||
Download || Contacts || Home
Copyright © 1999 - 2013, InterIntelligence Research